Despite taking the world’s most time-intensive intro to Java course, I’ve made slow but steady progress on this project. Today, it seems, is the day the GPS integration step is finally complete. Now for the accelerometer.
I’ve kept a to-do-list log of each step along this journey, and looking back it looks much more impressive than it feels. In the last two weeks I’ve reformatted the SD card, installed a different OS to the Pi unit (Raspbian Jessie, instead of NOOBS), reconfigured the Pi to US keyboard inputs, set up an SSH interface to control the Pi from my laptop, found a way to power the unit and tested it, installed all relevant GPS programs, wrote a script that begins the GPS unit 60 seconds after startup, then sends the logged data to a file named automatically for the startup time, re-connected the Pi to both the household wifi network and related bluetooth devices, created an OpenStreetMaps.org account, set up RealVNC Viewer and Server for my laptop and Pi unit respectively, figured out how to send files from the Pi back to my laptop via wifi, and then found a converter to convert the Pi’s .nmea GPS data to .gpx format.
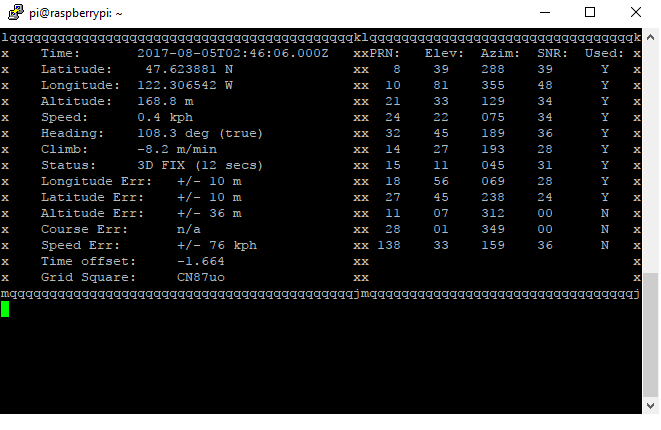
It took hours to get those numbers to show up, and seeing this even several days later it’s still satisfying to look at.
The most difficult elements from that list were, in descending order:
- RealVNC setup: I have no experience working on anything but the computer sitting in front of me, so learning about IP addresses, SSH interfaces, whether I needed to be “headless” with no monitor hooked up or not (headless, no doubt about it), and figuring out how to transfer files between the computers was a hassle. An enormously informative hassle, but a hassle. Once I figured out that the Pi couldn’t be viewed remotely while hooked to a monitor everything got much easier, but there was a great deal of head scratching involved.
- GPS setup: The Pi doesn’t do plug and play very well. In order to get this running I had to download FoxtrotGPS, GPSBabel, and then figure out how to get that data into a file. By using Google, I was able to find other people who had run into the same problem and read through forum responses for hours on end. In the end I was fortunate enough to find this walkthrough: http://www.instructables.com/id/Raspberry-Pi-3-GPS-Data-Logger/ . This was very helpful, and ultimately led to my GPS tracker/logger working perfectly.
- Converting from .nmea to .gpx for upload: Now that the GPS system worked on startup and fed the correct data to the correctly named files in the correct place, it was time to find a way to convert that to a format which I could upload to the OpenStreetMaps.org site for testing. This is number 3 on the list for the simple reason that it wasn’t very hard to do.. After half an hour of Googling, searching for converters, I found a very easy setup to accomplish this task here: http://wiki.openstreetmap.org/wiki/Converting/NMEA_to_GPX . Once that was done, I converted all of my .nmea files, isolated the one I’d used for testing, and uploaded it to the map site.
Like I said, it looks more impressive than it feels. Right now the GPS works, which was my initial benchmark. Now it’s time to figure out the accelerometer.
The accelerometer is where I am completely out of my depth. I’ve never taken so much as an introductory physics course, so the data I’ll be getting back from it is likely going to be very difficult for me to interpret. I’m fortunate enough to know that my old Python professor is also a physics professor and engineer, so in the next few days I’ll be tracking down Professor Wellman and asking him a few questions. He’s the kind of guy that wants people to be excited about the stuff he teaches, so I have no doubt he’d be happy to lend the occasional hand when I run into a roadblock.
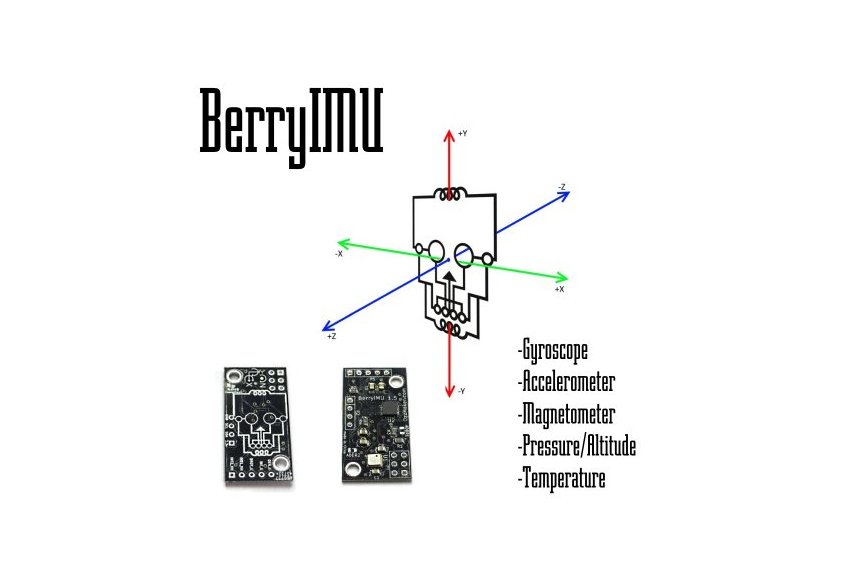
The current leading candidate.
That leads me to my next problem of determining what features and style of accelerometer do I want? Right now I’m powering the Pi from a cell phone charging pack which works perfectly, except it’s portable and the accelerometer will have to be attached to the bike on a permanent basis in order to provide consistent data. Ideally there would be a USB plug for the accelerometer, but that doesn’t appear to be how it works. The models I’ve seen are too small for that luxury, so it appears I’ll need to begin working on powering it via pins and wires. Fortunately, my parents’ neighbor is an electrical engineer with a doctorate from Penn State, so I’ll be taking a fancy Belgian beer to him in the next few weeks to buy some of his knowledge as it pertains to this problem.
Finally, what features do I need in an accelerometer for this application? Certainly 3 axis with a gyroscope to measure bike attitude, but there are also models with thermometers, shock sensors, barometers, and various other sources of information. I’d like to have the thermometer and shock sensors in order to be able to relay relevant data, but beyond that I’ll have to do some research on what information would be useful for my application.
Right now, though, it’s time to enjoy the fact that I’ve hit my first benchmark. For $80 dollars and an old cell phone charge pack I now have a fully functional GPS tracker/data logger which connects to my computer. That enjoyment and satisfaction will probably only last as long as it takes to post this, at which point the accelerometer work begins.
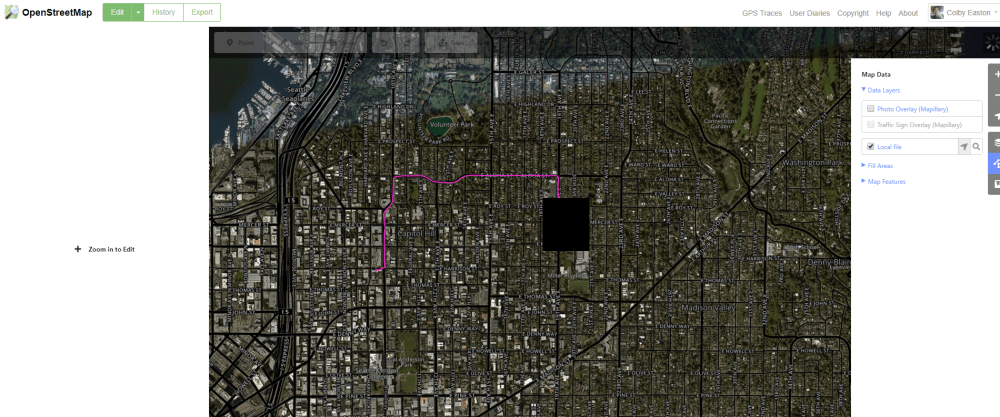
An awful lot of work went into that little pink line to QFC.
Next steps:
- Determine which features need to be incorporated into the accelerometer.
- Find unit that has all of those features at a reasonable price.
- Buy it.
- Find a place to mount it on the bike where it won’t be exposed to water or dust.
- Find, install, and learn how to use relevant software.
- Program it to start on boot.
- Create output folder for data files.
- Try not to get ahead of myself and even think the word “satellite”.
